What is Compression?
Each Data Load done in an info-cube is uniquely identified with a request ID associated with them. The Concept of deleting these meaningful load identifiers in info-cubes is called as Compression.
Why Compression?
- Compression improves Performance Tuning as it removes the redundant data. This improvement in the performance can be checked by RSRT and running the query with compression & without compression.
- Compression reduces memory consumption due to following:
1. Deletes request IDs associated with the Data.
2. It reduces redundancy by grouping by on dimension & aggregating on cumulative key-figures.
3. It deletes
- Above three points are explained in detail on Pg 4 onwards.
Logic behind Performance Improvement after Compression
SAP compression reduces the number of rows in the F fact table (sometimes to zero). This is because when requests are compressed data moves from F - Fact Table to E- Fact Table.
- A smaller F fact table results in –
1. Accelerated loading into the F fact table.
2. Faster updating of the F fact table indexes.
3. Accelerates aggregate rollups, since the F fact table is the source of data for rollup.
4. Shortens RUNSTATS processing time on the F fact table.
5. Reduces index REBUILD processing time if indexes are dropped as part of load.
SAP compression resets the reference point for non-cumulative key figures. This can improve query performance, since fewer rows are needed to calculate key figure values queries for dates near to the reference point.
SAP compression sometimes reduces data storage requirements when rows from more than one package have the same time value (that is, Package 1 and 2 were loaded on the same day, for example). In situations where the F fact table contains packages that do not overlap time periods, SAP compression may not reduce disk storage requirements. But even in this situation, SAP compression is always recommended because of the other advantages.
How to do Compression?
Go to RSA1 >> Select Cube >> Manage >> Requests (Tab)
In the below screen we can Compression status marked in Red is empty. This means these 3 requests are not compressed. So we can go ahead with the compression of these requests.

Figure 1: Requests not compressed so no check in the column compression Status
Go to Collapse Tab >> Select Req ID = 21 >> Click Release.

Figure 2: Shows Collapse tab is used to compress a given request in a Cube.
Back to Request Tab and here you observe a tick mark for Request 21 appears in the compression Status column, this shows request is now compressed in the cube.

Effect of the compression on the Data in the cube:
Data before Compression:--

Figure 4: shows data before compression with request numbers
Data after Compression: All Request Ids associated with the Request 21 are deleted.

Figure 5: Shows all request id deleted once request is compressed.
What happens after Compression?
1. After compression of the cube, data will be moved from “F” fact table to “E” fact table & request IDs associated with the data are deleted (as seen above).

Figure 6: Shows how data stored in F fact table moved to E fact table after compression
We can see these tables “F Fact Table” & “E Fact table” in T-Code – SE11. As shown in the above figure the table names will be:
/BIC/FZCMPRS_1 & /BIC/EZCMPRS_1
As we have seen above out of the three requests one request “21” is compressed, so data for that request “20 Records” should be present in the E table where as remaining “39 records” should be present in the “F” table.


Figure 9: Record count in F fact table
Thus we saw the compressed data is now present in E Fact table: /BIC/EZCMPRS_1 & the uncompressed data is present in the F fact table /BIC/FZCMPRS_1
2. When you compress, BW does a group by on the dimension and sum on measures, this eliminates, redundant information.
a. As can be seen below for the same Doc Number: 1001, different sales figures are loaded in two different requests. But here country, plant & document no is repeated hence redundant. Similarly the case with doc number: 1002, 1003, 1004 & 1005.

Figure 10: Different Data Loaded in Different Requests for the same set of characteristics.
If these two requests are compressed, then for the above set of data we will see only one record per document number, with sales aggregated for each document, number.
To Verify this we go to cube >> Manage >> Requests (tab) >> check the two requests (Not Compressed (hence the data in the above screenshot).

Figure 11: Shows Data in the above two requests not compressed.
Now go to Collapse tab >> Release, and now the requests are compressed.

Figure 12: Data Compressed as Compression Status column shows Tick Mark.
Now we check the data in the cube:

Figure 13: Request ID deleted & 0SAL aggregated for the set of Characteristics in the dimension.
So after compression, redundant data is removed and now we have only 5 entries in spite of 10 entries before compression.
3. Compression also does “Zero Elimination”. Zero Elimination means deleting the record from the cube after compression if and only if, the entire key figures of the particular record is zero. If there are two key figures A & B, A = 0, B = 10, then this record will not be deleted from the cube.
In the Above cube we load one more request with 0sal = 0, Please check the data as follows:
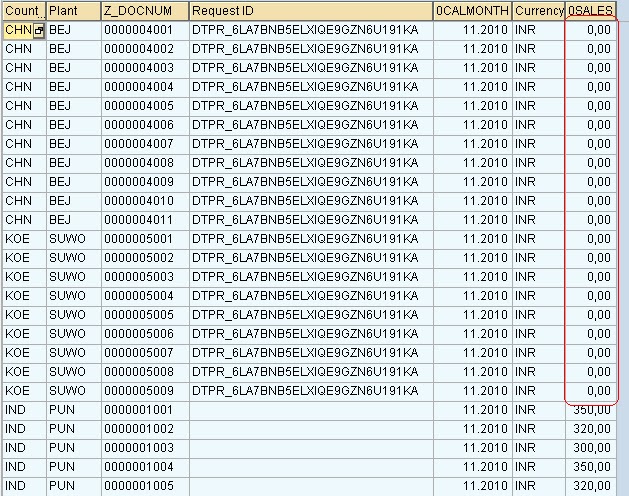
Figure 14: Shows a new Request Data with key-figure value =0.
Now we will compress this request with “Zero-elimination”.

Figure 15: Shows request compression with “Zero Elimination”.
Now Click Release and check the Content of the Cube:

Figure 16: Shows all Records with Key-Figure = 0 are deleted after compression.
Please Remember: “Zero – Elimination” works only for data present in F fact table and not with data in E fact table, it means if data is compressed without “Zero-elimination”, it will be moved to E fact table and now it is not possible to handle such records (delete) via zero-elimination. Mind well, it is possible to apply zero-elimination on the requests which will be compressed now onwards.
Such records with All Key-figure value zero, can be handled only by copying the data to a temp cube and then compress the request in the cube with “Zero-elimination enabled”.
Deletion of such Records is also not possible via selective deletion, because while selective deletion it allows to do a selection only on characteristics and not on key-figures.
What is Reverse Posting?
Once a cube is compressed, you cannot alter the information in it. This creates a big problem when the data which is compressed has some wrong entries. To delete these wrong entries SAP provides a way out called “Reverse Posting”. Reverse Posting is Possible only if the request is loaded via a PSA, then you can nullify the entries that you have sent for a particular request (by values I mean key figures).
Reverse posting will reverse the sign of the key-figures loaded for a particular request and again load it to the cube, so that it will make overall key figure value = 0.
Remember: Reverse Posting is a Concept of SAP BW 3.x and not SAP BI 7.0.
Reverse Posting is Possible only if the Data is loaded to Cube via PSA, if the Data is loaded to ODS, reverse posting is not possible. Even if you try to a reverse posting the system will give a message “No Info-Cube Selected for Reversal, action Terminated”. To See how Reverse Posting Works Please follow as below:
Consider a Cube “TEDEMO01” with 4 records as shown below, these 4 records are loaded to the cube via a request which is now compressed. Now somehow it was observed that all the records loaded in this request has got wrong key-figure values. As the request is compressed, only way to correct this wrong data is by selective deletion over cube. But imagine a scenario where the number of records are huge, so selective deletion is not possible, in this case we can use Reverse posting.

Figure 17: Sales figure (wrong Posting).
In the “Load Monitor”, select the request go to Edit >> Update/Reversal >> Request Reverse Posting.

Figure 18: Reverse Posting Navigation.
Select the Update Rule &Click Yes.
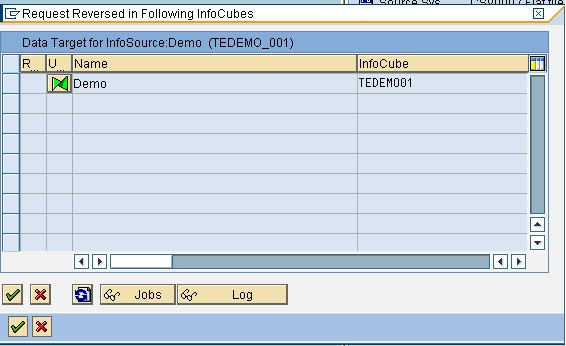
Figure 19: Intermediate Screen.
Click Immediate.

Figure 20: Intermediate Screen.
Reverse Posting started, check the target, you will see one more request in the target with description “Reversal”.

Figure 21: Manage screen shows a reverse posting Request.
Check the Info-cube Content, you will find for each entry created by the wrong request, a record with negative key-figure value is inserted. And the Summation of all these values is now coming to be Zero.

Figure 22: Reverse posting records posted in the Cube to nullify the wrong posting.
Hence Reverse Posting corrected the wrong entry in the Cube.
:Some FAQ’s Q: Which compression should be done first, the cube compression or Aggregate Compression?
Compression of Info-Cube and it’s Aggregates are two independent events. If an info-cube is compressed there is no point in keeping the aggregates uncompressed because the request number associated with the data will be lost, so once the cube is compressed the aggregates should also be compressed.
One important point to note here is a request should be rolled up first and only the compressed, because if a request is compressed first then it cannot be rolled up into aggregates. So If one wants to compress a cube which has one aggregate, then in such a case the request should be rolled up first and then it should be compressed in the cube. And as already stated earlier there is no point in keeping aggregates uncompressed if the cube is compressed, so the request should be compressed also along with roll up in the aggregates.
So finally we end up Rollup & Compress a request in aggregates followed by Compression of the cube.
Q: Can a Compressed request entry be deleted from Manage tab of a Cube?
Once a Request is compressed, system does not allow you to delete the entry from the manage tab.
Courtesy: Mr.Sameer Ganesh.
No comments:
Post a Comment